EmrEtlRunner
Snowplow EmrEtlRunner is a deprecated application that ran Snowplow's batch processing jobs in AWS EMR, such as the RDB shredder. See the RDB loader R35 upgrade guide for how to migrate away from this application.
Historically it was also used for enriching data, but that functionality was deprecated even longer ago in favour of the streaming versions of Enrich.
Setting up EmrEtlRunner
This guide covers:
- Installation. You need to install EmrEtlRunner on your own server. It will interact with Amazon Elastic MapReduce and S3 via the Amazon API
- Usage. How to use EmrEtlRunner at the command line, to instruct it to process data from your collector
- Scheduling. How to schedule the tool so that you always have an up to date set of cleaned, enriched data available for analysis
- Configuring shredding. How to configure Snowplow to shred custom self-describing events (also called unstructured events) and contexts ready for loading into dedicated tables in Redshift
In this guide you'll also find additional information:
- A deeper technical explanation of EtlEmrRunner
- A guide for setting up end to end encryption
- A guide to setting up an EC2 instance for EmrEtlRunner
Installing EmrEtlRunner
Assumptions
This guide assumes that you have administrator access to a Unix-based server (e.g. Ubuntu, OS X, Fedora) on which you can install EmrEtlRunner and schedule a regular cronjob.
You might wish to try out the steps showing you how an EC2 instance could be set up via AWS CLI.
In theory EmrEtlRunner can be deployed onto a Windows-based server, using the Windows Task Scheduler instead of cron, but this has not been tested or documented.
Dependencies
Hardware
You will need to setup EmrEtlRunner on your own server. A number of people choose to do so on an EC2 instance (thereby keeping all of Snowplow in the Amazon Cloud). If you do so, please note that you must not use a t1.micro instance. You should at the very least use an m1.small instance.
EC2 key
You will also need an EC2 key pair setup in your Amazon EMR account.
For details on how to do this, please see Create a Key Pair. Make sure that you setup the EC2 key pair inside the region in which you will be running your ETL jobs.
S3 locations
EmrEtlRunner processes data through two states:
- :enriched - Enriched Snowplow events are the input to the EmrEtlRunner process
- :shredded - EmrEtlRunner shreds JSONs found in enriched events ready for loading into dedicated Redshift tables
For :enriched:stream, specify the Amazon S3 path you configured for your S3 loader.
For all other S3 locations, you can specify paths within a single S3 bucket that you setup now.
Done? Right, now we can install EmrEtlRunner.
Installation
EmrEtlRunner is hosted in the Releases section of the Github repo.
wget https://github.com/snowplow/emr-etl-runner/releases/download/1.0.4/snowplow_emr_1.0.4.zip
The archive contains both EmrEtlRunner and StorageLoader. Unzip the archive:
unzip snowplow_emr_{{RELEASE_VERSION}}.zip
The archive should contain a snowplow-emr-etl-runner file.
Configuration
EmrEtlRunner requires a YAML format configuration file to run. There is a configuration file template available in the Snowplow GitHub repository at https://github.com/snowplow/emr-etl-runner/blob/master/config/config.yml.sample. See Common configuration more information on how to write this file.
Storage targets
Storages for data can be configured using storage targets JSONs. Configuration file templates available in the Snowplow GitHub repository at /4-storage/config/targets directory
Iglu
You will also need an Iglu resolver configuration file. This is where we list the schema repositories to use to retrieve JSON Schemas for validation. For more information on this, see the wiki page for Configuring shredding.
Using EmrEtlRunner
EmrEtlRunner works in Rolling mode where it processes whatever raw Snowplow event logs it finds in the In Bucket
Commands
Run command
The most useful command is the run command which allows you to actually run your EMR job:
./snowplow-emr-etl-runner run
The available options are as follows:
Usage: run [options]
    -c, --config CONFIG              configuration file
    -n, --enrichments ENRICHMENTS    enrichments directory
    -r, --resolver RESOLVER          Iglu resolver file
    -t, --targets TARGETS            targets directory
    -d, --debug                      enable EMR Job Flow debugging
    -f {enrich,shred,elasticsearch,archive_raw,rdb_load,analyze,archive_enriched,archive_shredded,staging_stream_enrich},
        --resume-from                resume from the specified step
    -x {staging,enrich,shred,elasticsearch,archive_raw,rdb_load,consistency_check,analyze,load_manifest_check,archive_enriched,archive_shredded,staging_stream_enrich},
        --skip                       skip the specified step(s)
    -i, --include {vacuum}           include additional step(s)
    -l, --lock PATH                  where to store the lock
        --ignore-lock-on-start       ignore the lock if it is set when starting
        --consul ADDRESS             address to the Consul server
Note that the config and resolver options are mandatory.
Note that in Stream Enrich mode you cannot skip nor resume from staging, enrich and archive_raw. Instead of staging and enrich, in Stream Enrich mode single special staging_stream_enrich is used.
Lint commands
Other useful commands include the lint commands which allows you to check the validity of your resolver or enrichments with respect to their respective schemas.
If you want to lint your resolver:
./snowplow-emr-etl-runner lint resolver
The mandatory options are:
Usage: lint resolver [options]
    -r, --resolver RESOLVER          Iglu resolver file
If you want to lint your enrichments:
./snowplow-emr-etl-runner lint enrichments
The mandatory options are:
Usage: lint enrichments [options]
    -r, --resolver RESOLVER          Iglu resolver file
    -n, --enrichments ENRICHMENTS    enrichments directory
Checking the results
Once you have run the EmrEtlRunner you should be able to manually inspect in S3 the folder specified in the :out: parameter in your config.yml file and see new files generated, which will contain the cleaned data either for uploading into a storage target (e.g. Redshift) or for analysing directly using Hive or Spark or some other querying tool on EMR.
Note: most Snowplow users run the 'spark' version of the ETL process, in which case the data generated is saved into subfolders with names of the form part-000.... If, however, you are running the legacy 'hive' ETL (because e.g. you want to use Hive as your storage target, rather than Redshift, which is the only storage target the 'spark' etl currently supports), the subfolders names will be of the format dt=....
Scheduling EmrEtlRunner
Once you have the ETL process working smoothly, you can schedule a daily (or more frequent) task to automate the daily ETL process.
We run our daily ETL jobs at 3 AM UTC so that we are sure that we have processed all of the events from the day before (CloudFront logs can take some time to arrive).
To consider your different scheduling options in turn:
cron
Warning
Running EmrEtlRunner as Ruby (rather than JRuby apps) is no longer actively supported.
The recommended way of scheduling the ETL process is as a daily cronjob.
0 4 * * * root cronic /path/to/eer/snowplow-emr-etl-runner run -c config.yml
This will run the ETL job daily at 4 AM, emailing any failures to you via cronic.
Jenkins
Some developers use the Jenkins continuous integration server, which is very similar) to schedule their Hadoop and Hive jobs.
Describing how to do this is out of scope for this guide, but the blog post Lowtech Monitoring with Jenkins is a great tutorial on using Jenkins for non-CI-related tasks, and could be easily adapted to schedule EmrEtlRunner.
Configuring shredding
Snowplow has a Shredding process for Redshift which contributes to the following three phases:
- Extracting unstructured event JSONs and context JSONs from enriched event files into their own files
- Removing endogenous duplicate records, which are sometimes introduced within the Snowplow pipeline (feature added to r76)
- Loading those files into corresponding tables in Redshift
The first two phases are instrumented by EmrEtlRunner; in this page we will explain how to configure the shredding process to operate smoothly with EmrEtlRunner.
**Note: Even though the first phase is required only if you want to shred your own unstructured event JSONs and context JSONs, the second phase will be beneficial to data modeling and analysis. If none of it is required and you are only shredding Snowplow-authored JSONs like link clicks and ad impressions, then you can skip this step and go straight to loading shredded types.
Pre-requisites
This guide assumes that
all JSONs you are sending as unstructured events and contexts are self-describing JSONs
you have defined self-describing JSON Schemas for each of your JSONs
you have setup your own Iglu schema registry to host your schemas
Configuring EmrEtlRunner for shredding
The relevant section of the EmrEtlRunner's config.yml is:
shredded:
  good: s3://my-out-bucket/shredded/good       # e.g. s3://my-out-bucket/shredded/good
  bad: s3://my-out-bucket/shredded/bad        # e.g. s3://my-out-bucket/shredded/bad
  errors: s3://my-out-bucket/shredded/errors     # Leave blank unless :continue_on_unexpected_error: set to true below
  archive: s3://my-out-bucket/shredded/archive  # Not required for Postgres currently
The configuration file is referenced with --config option to EmrEtlRunner.
Please make sure that these shredded buckets are set correctly.
Next, we let EmrEtlRunner know about your Iglu schema registry, so that schemas can be retrieved from there as well as from Iglu Central. Add your own registry to the repositories array in iglu_resolver.json file:
{
  "schema": "iglu:com.snowplowanalytics.iglu/resolver-config/jsonschema/1-0-0",
  "data": {
    "cacheSize": 500,
    "repositories": [
      {
        "name": "Iglu Central",
        "priority": 0,
        "vendorPrefixes": [ "com.snowplowanalytics" ],
        "connection": {
          "http": {
            "uri": "http://iglucentral.com"
          }
        }
      }
      #custom section starts here -->
      ,
      {
       ...
      }
      #custom section ends here <--
    ]
  }
}
You must add an extra entr(-y/ies) in the repositories: array pointing to your own Iglu schema registry. If you are not submitting custom events and contexts and are not interested in shredding then there's no need in adding the custom section but the iglu_resolver.json file is still required and is referenced with --resolver option to EmrEtlRunner.
For more information on how to customize the iglu_resolver.json file, please review the Iglu resolver configuration page.
Technical explanation
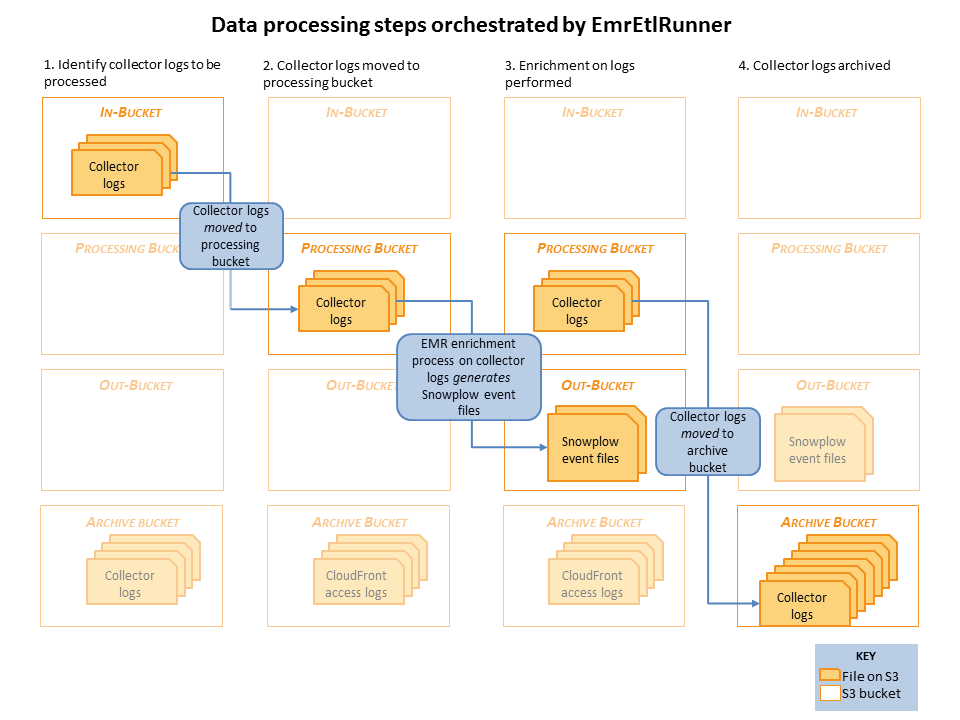
Raw collector logs that need to be processed are identified in the in-bucket. (This is the bucket that the collector log files are generated in: it's location is specified in the EmrEtlRunner config file.)
EmrEtlRunner then triggers the Enrichment process to run. It spins up an EMR cluster (the size of which is determined by the config file), uploads the JAR with the Spark Enrichment process on, and instructs EMR to:
- Use S3DistCopy to aggregate the collector log files and write them to HDFS
- Run the Enrichment process on those aggregated files in HDFS
- Write the output of that Enrichment to the Out-bucket in S3. (As specified in the config file).
- When the job has completed, EmrEtlRunner moves the processed collector log files from the in-bucket to the archive bucket. (This, again, is specified in the config file.)
By setting up a scheduling job to run EmrEtlRunner regularly, Snowplow users can ensure that the event data regularly flows through the Snowplow data pipeline from the collector to storage.
Many references are made to the 'Hadoop ETL' and 'Hive ETL' in the documentation and the config file. 'Hadoop ETL' refers to the current Spark-based Enrichment Process. 'Hive ETL' refers to the legacy Hive-based ETL process. EmrEtlRunner can be setup to instrument either. However, we recommend all Snowplow users use the Spark based 'Hadoop ETL', as it is much more robust, as well as being cheaper to run.
Setting up end-to-end encryption
It is possible to setup end-to-end encryption for EmrEtlRunner. For reference, you can check out the dedicated EMR guide: https://docs.aws.amazon.com/emr/latest/ManagementGuide/emr-data-encryption-options.html.
Pre-requisites
Encrypting S3 buckets
For at rest encryption on S3, the buckets with which EmrEtlRunner will interact need to have SSE-S3 encryption enabled.
For more information, check out the dedicated AWS guide: https://docs.aws.amazon.com/AmazonS3/latest/dev/serv-side-encryption.html.
Keep in mind that turning this setting on is not retroactive. It effectively means that if you want to have only encrypted data in your bucket you will need to go through the existing data and copy it in place.
Also, if you're using the Clojure Collector, SSE-S3 encryption needs to be set up at the bucket level.
Setting up an EMR security configuration
Through an EMR security configuraton, you can specify at the EMR level for which parts of your job you want encryption to be enforced, the possibilities are:
- At rest on S3
- At rest on local disks
- In-transit
At rest encryption in S3
Once setup, S3 encrypts data as it writes it to disk.
By default, even without encryption setup, data is encrypted while in transit from EMR to S3 (e.g. for s3-dist-cp steps).
At rest encryption on local disks
When running the Snowplow pipeline in EMR, an HDFS is setup on the different nodes of your cluster. Enabling encryption for the disks local to those nodes will have the following effects:
- HDFS RPC, e.g. between name node and data node, uses SASL
- HDFS block transfers (e.g. replication) are encrypted using AES 256
- Attached EBS volumes are encrypted using LUKS
When enabling this option, please keep the following drawbacks in mind:
- EBS root volumes are not encrypted, you need to use a custom AMI for that: https://docs.aws.amazon.com/emr/latest/ManagementGuide/emr-custom-ami.html
- KMS key usage is subject to pricing: https://aws.amazon.com/kms/pricing/
- It has a performance impact (e.g. when writing your enriched data to HDFS)
To set this type of encryption up you will need to create an appropriate KMS key, refer to the AWS guide for more information: https://docs.aws.amazon.com/kms/latest/developerguide/create-keys.html.
It is important to note that the role used in aws:emr:jobflow_role in the EmrEtlRunner configuration needs to have the kms:GenerateDataKey policy.
In-transit encryption (Spark and MapReduce)
When running the Spark jobs of the Snowplow pipeline (enrich and shred) or consolidating s3-dist-cp steps (e.g. using --groupBy or --targetSize), data is shuffled around the different nodes in your EMR cluster. Enabling encryption for those data movements will have the following effects:
- MapReduce shuffles use TLS
- RPC and data transfers in Spark are encrypted using AES 256 if emr >= 5.9.0, otherwise RPC is encrypted using SASL
- SSL is enabled for all things HTTP in Spark (e.g. history server and UI)
Be aware that this type of encryption also has a performance impact as data needs to be encrypted when sent over the network (e.g. when running deduplication in the Shred job).
To set up this type of encryption, you will need to create certificates according to the guidelines specified at https://docs.aws.amazon.com/emr/latest/ManagementGuide/emr-encryption-enable.html#emr-encryption-pem-certificate.
Note that, for this type of encryption to work, you will need to be in a VPC and the domain name specified in the certificates needs to be *.ec2.internal if in us-east-1 or *.region.compute.internal otherwise.
For more information, on all those types of encryption, you can refer to the dedicated guide: https://docs.aws.amazon.com/emr/latest/ManagementGuide/emr-create-security-configuration.html.
Configuring EmrEtlRunner for end-to-end encryption
To leverage the security configuration you created, you will need to specify it in the EmrEtlRunner configuration at: aws:emr:security_configuration.
Additionally, you will need to tell EmrEtlRunner that it will have to interact with encrypted buckets through: aws:s3:buckets:encrypted: true.
Setting up EC2 instance for EmrEtlRunner and StorageLoader
This tutorial assumes it's your first installation and you probably just want to checkout the platform. Thus many steps describe low-performance and unsecured installation. In real-world scenario you may want to fix that.
Prepare your system
Before getting started you need to have:
- Account on Amazon Web Services.
- Installed AWS CLI.
- IAM user, first one need to be created in AWS Console.
- IAM user need to have attached
AdministratorAccess. - Configured credentials on your local machine. (You can use
aws configurefor it). - For some steps you may want to install
jq. It's optional, but handy.
Everything else can be done from CLI.
Setting up EC2 instance for EmrEtlRunner/StorageLoader
In the end of this step, you'll have an AWS EC2 instance, SSH access to it and key stored on local machine.
Find your Default VPC ID
We will refer to it as {{ VPC_ID }}.
aws ec2 describe-vpcs | jq -r ".Vpcs[0].VpcId"
NOTE: This step assumes the default VPC will be first in the list. If your environment has multiple VPCs, run the describe command without piping it to jq to get the ID of the default VPC. Mixing VPC IDs will result in the creation of an unreachable EC2 instance.
Create Security Group for SSH access
On output you'll get GroupId. We will refer to it as {{ SSH_SG }}.
aws ec2 create-security-group \
    --group-name "EC2 SSH full access" \
    --description "Unsafe. Use for demonstration only" \
    --vpc-id {{ VPC_ID }} \
    | jq -r '.GroupId'
Add rule allowing SSH access from anywhere
aws ec2 authorize-security-group-ingress \
    --group-id {{ SSH_SG }} \
    --protocol tcp \
    --port 22 \
    --cidr 0.0.0.0/0
Create SSH key-pair named on the local machine
We named it "snowplow-ec2" here.
aws ec2 create-key-pair --key-name snowplow-ec2 \
    | jq -r ".KeyMaterial" > ~/.ssh/snowplow-ec2.pem
chmod go-rwx ~/.ssh/snowplow-ec2.pem
Run t2.small instance with Amazon Linux AMI with previously created SSH-key
On output you will get your instance id. We will refer to it as {{ INSTANCE_ID }}.
aws ec2 run-instances \
    --image-id ami-60b6c60a \
    --count 1 \
    --instance-type t2.small \
    --key-name snowplow-ec2 \
    | jq -r '.Instances[0].InstanceId'
NOTE: you can find available image ID by following this AWS guide.
Attach security group to Instance
aws ec2 modify-instance-attribute \
    --instance-id {{ INSTANCE_ID }} \
    --groups {{ SSH_SG }}
Check public IP-address of newly created Instance
Further we will refer to it as {{ PUBLIC_IP }}.
aws ec2 describe-instances \
    --instance-ids {{ INSTANCE_ID }} \
    | jq '.Reservations[0].Instances[0].PublicDnsName'
Log-in
Fill-in {{ PUBLIC_IP }} from previous step.
ssh -i ~/.ssh/snowplow-ec2.pem ec2-user@{{ PUBLIC_IP }}